Table of Contents
Open Table of Contents
- Best 4 Finger HUD Layout for PUBG Mobile (2026 Guide)
- Why 4 Finger HUD Changes Everything
- The Physical Setup Before Anything Else
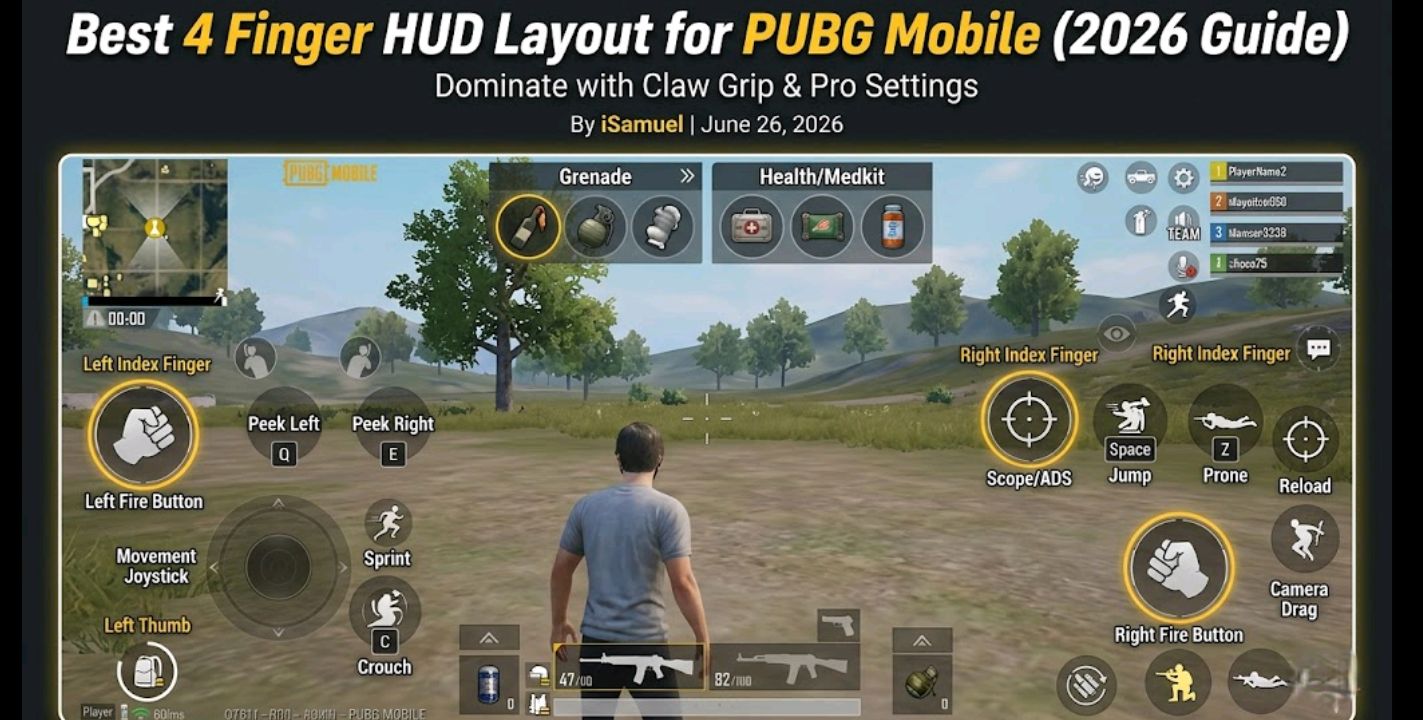
- Recommended 4 Finger HUD Layout
- Detailed Button Placement Logic
- Common Mistakes When Setting Up 4 Finger HUD
- Sensitivity Settings to Pair With This HUD
- Transitioning From 2-Finger to 4-Finger
- 4 Finger HUD vs Gyroscope vs 6 Finger — Quick Comparison
- Best Weapons to Use With 4 Finger Layout
- FAQ
Best 4 Finger HUD Layout for PUBG Mobile (2026 Guide)
If you’ve been playing PUBG Mobile with two thumbs and wondering why you keep losing close-range fights — this is the answer. Switching to a 4 finger setup isn’t just a mechanical upgrade, it rewires how you engage in combat entirely. You move, shoot, and scope simultaneously without ever pulling your thumb off the firing button.
That’s the edge. That’s what separates players who die mid-peek from players who beam enemies through smoke.
This guide covers the exact HUD layout, button placement logic, ADS mode recommendations, and everything you need to make the transition feel manageable — whether you’re coming from 2-finger or already halfway into claw grip.
Why 4 Finger HUD Changes Everything
Standard two-thumb play has a hard ceiling. The moment you shoot, your left thumb is locked on movement. The moment you scope, your right thumb leaves the fire button. These micro-gaps — fractions of a second — are where kills happen against you.
Four finger play removes that tradeoff. Your index fingers handle scope and fire while your thumbs handle movement and camera. That combination lets you:
- Peek and fire without slowing down
- Scope in without pausing fire
- Jump-spray or crouch-spray without losing aim
- React to third-party attacks while mid-engagement
It takes real adjustment. The first few sessions will feel unnatural and your stats will drop. Many players begin feeling more comfortable after about a week of consistent practice, though it can easily take several weeks before the new layout feels completely natural — and that’s fine. The ceiling you unlock is worth the grind.
The Physical Setup Before Anything Else
Before touching HUD settings, your grip has to be right. Four finger play typically uses a modified claw grip — thumbs on the screen surface as normal, with both index fingers curled over the top edge of the phone, touching the upper portion of the screen.
Some players use pinky fingers on the back for stability, or ring fingers resting on volume buttons depending on the device. Don’t overthink it at first. The classic starting point is:
- Left thumb — movement joystick
- Right thumb — camera / drag aim
- Left index finger — fire button (left side, upper area)
- Right index finger — scope / ADS button
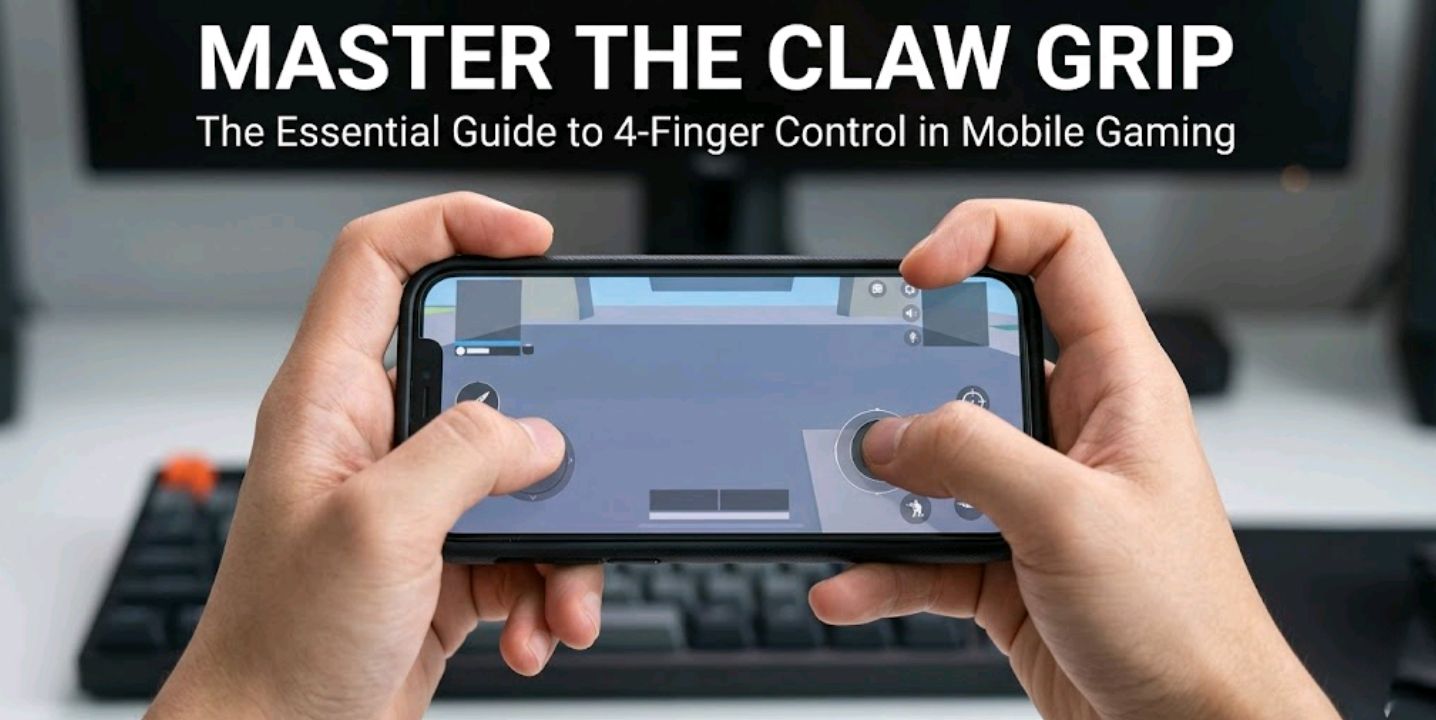
Get comfortable holding your phone this way for 10 minutes before you even open the game. Grip stability matters more than most players realize — if your phone shifts during a fight, every placement decision you made in HUD settings becomes irrelevant.
Recommended 4 Finger HUD Layout
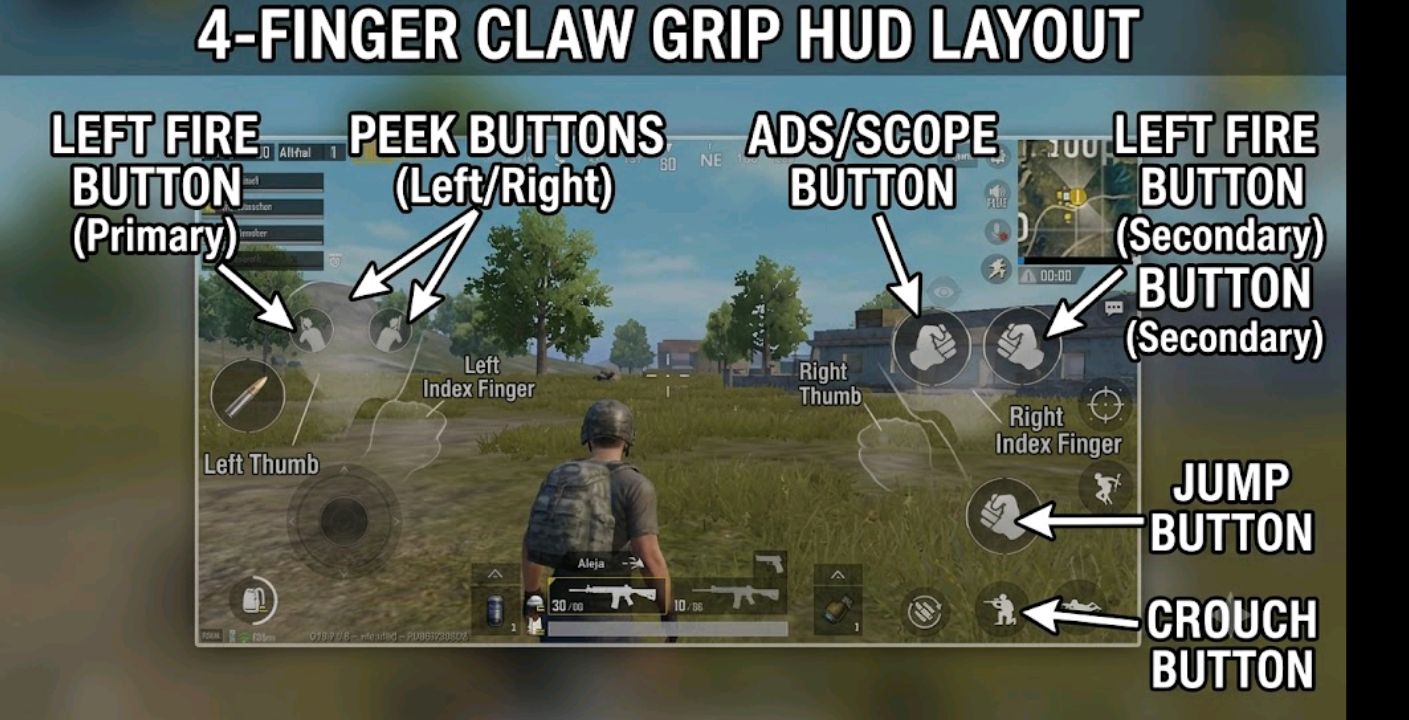
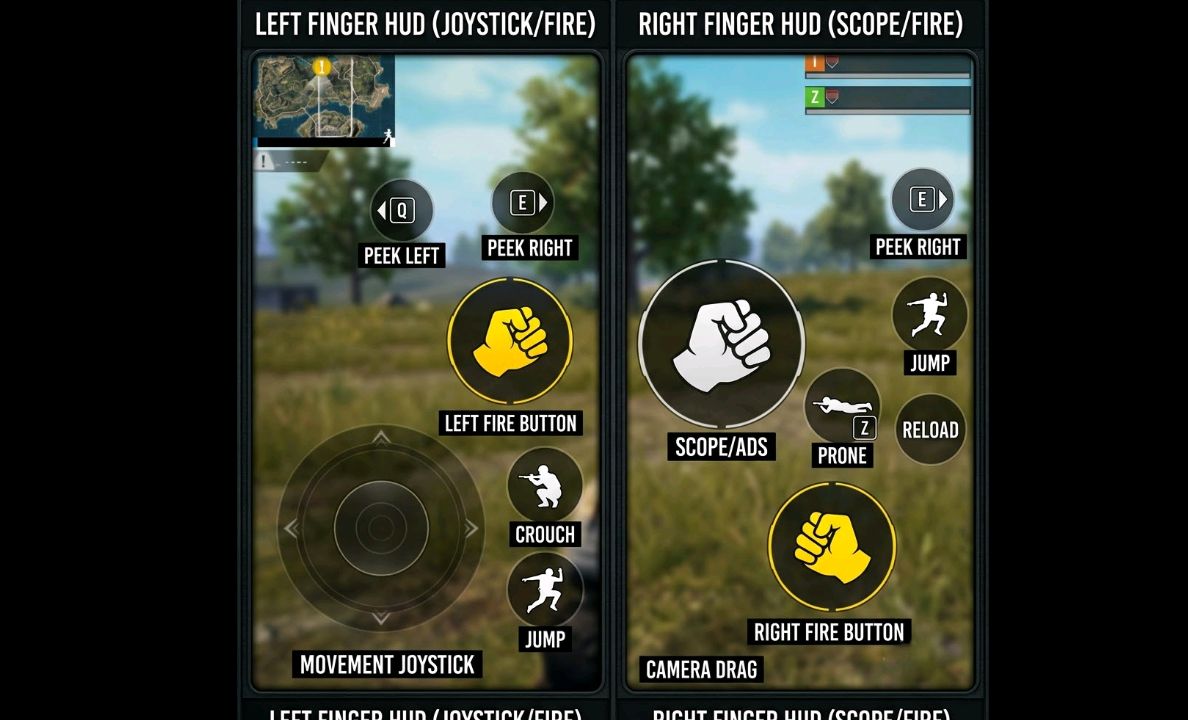
Here’s a layout built for control and speed. Every button position is intentional — nothing placed by feel or default.
Left Side Controls
| Button | Recommended Position | Purpose |
|---|---|---|
| Movement Joystick | Bottom-left corner | Primary movement, stays fixed |
| Crouch / Prone | Left-center, above joystick | Quick stance switch mid-fight |
| Jump | Far left, mid-height | Hop over cover without breaking aim |
| Peek Left | Upper-left edge | Blind peek without full body exposure |
Right Side Controls
| Button | Recommended Position | Purpose |
|---|---|---|
| Fire Button | Right-center (index reach zone) | Continuous fire without thumb movement |
| Scope / ADS | Upper-right, index finger zone | ADS without releasing fire |
| Reload | Right-center, lower | Fast reload after clearing a clip |
| Peek Right | Upper-right edge | Mirror of left peek |
Center / Top Controls
| Button | Recommended Position | Purpose |
|---|---|---|
| Throwable (Grenade) | Top-center, left-ish | Quick throw without fumbling inventory |
| Medkit / Bandage | Top-right shortcut area | Fast heal between pushes |
| Map / Minimap | Top-left corner | Always visible, rarely touched mid-fight |
Detailed Button Placement Logic
Fire Button
This is the most critical placement in a 4 finger layout. Most players who struggle with the transition place the fire button too low — their index finger ends up reaching awkwardly or lifting off the screen edge entirely.
Place it roughly two-thirds up the right side of the screen, within a natural curl of your right index finger. You want to tap it without any lateral hand movement whatsoever.
Fixed or floating fire button? Use a fixed fire button for 4-finger play. A floating fire button drifts based on where you first press, which is designed for 2-finger players who move their thumb freely. With a fixed layout, your index finger lands in the same spot every time — which is exactly what muscle memory needs to build.
Size: go slightly larger than default. You’ll miss inputs early on — a bigger button gives more margin while you’re building accuracy.
Scope / ADS Button and ADS Mode
Your right index finger handles both scope and camera drag depending on the moment. Most 4 finger players keep ADS on the right index and use the right thumb for camera drag only.
Place scope directly above or slightly to the right of the fire button — a natural vertical roll of the same finger. Down for fire, up for scope.
Which ADS mode to use? This is a question most HUD guides skip.
- Hold to ADS — You hold the scope button to stay scoped. Good for beginners learning the layout because it’s explicit. The downside is your index finger is committed to that button the entire time you’re aiming.
- Tap to ADS — One tap scopes in, another taps out. Frees up your index finger faster after scoping. Most experienced 4-finger players prefer this.
- Mixed ADS — Tapping fires in hipfire mode; holding scopes. This mode works well for aggressive close-range play where you want quick hipfire but can hold for mid-range scope. Worth testing once you’re comfortable with the layout.
Enable Peek & Open Scope if it isn’t already on. With this setting active, you can peek out and ADS simultaneously with one action instead of two separate inputs. For 4-finger play where speed is the point, this is worth enabling in your control settings.
Do not use gyroscope-as-ADS. Gyroscope works best as a supplementary aim correction tool once already scoped, not as the primary ADS trigger.
Left Fire Button
Enable the Left Fire Button. Some players disable it thinking it creates accidental inputs — but for 4-finger play specifically, the left index finger being on the left fire button is exactly the setup. With it enabled, either index finger can initiate firing, which is critical during movement-heavy close-range fights when your left hand is doing most of the work.
If you’re getting accidental fires from the left side early on, adjust placement rather than disabling the button entirely.
Crouch and Jump
These live on the left side, used by the left index finger or occasionally the left thumb when movement is momentarily paused.
Crouch should sit comfortably above the movement joystick — not so far you have to stretch, not so close you hit it mid-run. The sweet spot is roughly the middle-left of the screen, slightly in the top half.
Jump can go further left and higher. Most fights use jump-peek rather than full jump-spray, so it doesn’t need to be as instantly accessible as fire or crouch.
Peek Buttons
Free-peeking is one of the highest-value mechanics in ranked play — it exposes only part of your hitbox while firing. A lot of players bury peek buttons in awkward corners or skip them entirely. That’s a mistake.
Both peek buttons should sit near the top of the screen, reachable by index fingers without shifting grip. Left peek slightly inward from the left edge, right peek inward from the right. Keep them large enough that a quick upper-screen tap lands consistently.
Common Mistakes When Setting Up 4 Finger HUD
Placing buttons too close together. Everything blends and you trigger the wrong input mid-fight. Give each button breathing room — especially fire, scope, and crouch.
Keeping the default joystick size. The default movement joystick is smaller than most players need. Increase it by 10–15% to reduce thumb slippage during strafes.
Ignoring the gyroscope pairing. Four finger play and gyroscope work together, not against each other. Use gyro for micro-adjustments while scoped. For a full breakdown of how to set it up, see the best gyroscope settings for PUBG Mobile guide.
Not using a layout backup. PUBG Mobile allows multiple HUD presets. Save your old 2-finger layout as a backup — switching to it for TDM while you practice with 4-finger in Classic means you’re not just grinding through frustration every session.
Skipping the Peek & Open Scope setting. Mentioned above in the ADS section — easy to overlook, high impact. Check your basic settings tab and make sure it’s enabled.
Sensitivity Settings to Pair With This HUD
Your HUD layout is only half the equation. With four fingers, the right thumb’s role in camera drag narrows — you’re no longer making wide full-screen arcs, so sensitivity can be tuned tighter than typical 2-finger values.
Starting ranges that pair well with a 4 finger layout:
| Scope Type | Suggested Sensitivity Range |
|---|---|
| No Scope (Hipfire) | 120 – 150 |
| Red Dot / Holographic | 55 – 70 |
| 2x Scope | 40 – 55 |
| 3x Scope | 30 – 42 |
| 4x Scope | 25 – 35 |
| 6x Scope | 18 – 27 |
| 8x Scope | 12 – 18 |
Gyroscope sensitivity typically runs slightly higher than these touch values since it handles fine correction after the initial aim is set. A common starting point is 1.5x your touch sensitivity per scope type, then adjust down if it feels too twitchy.
For the full breakdown with per-device recommendations, the best sensitivity settings for PUBG Mobile 2026 guide covers it in detail.
Transitioning From 2-Finger to 4-Finger
The transition is the hardest part, and many players abandon it in the first three days. Here’s a realistic timeline of what to expect:
Days 1–3: Everything feels wrong. You’ll lose matches you’d normally win. This is expected — your muscle memory is actively fighting the new layout. Play TDM exclusively during this phase. Short respawn loops mean faster reps without the frustration of dying early in a 30-minute Classic match.
Days 4–7: Inputs start landing more consistently. The fire-and-scope combo will begin clicking in specific engagements. Keep playing TDM but start mixing in Classic matches to get used to the pacing.
Week 2: Classic matches become playable again. You’re likely not back to your previous skill floor yet, but you’ll start feeling the ceiling is higher — that’s the sign the switch is working.
Week 3–4: Muscle memory is mostly formed. This is the time to refine — maybe fire is positioned a fraction too high, maybe your crouch keeps getting missed at range. Small adjustments now have meaningful impact.
Some players adapt faster, some take longer. There’s no single timeline that fits everyone. What matters is consistency over raw hours — daily sessions of 1–2 hours beat 6-hour weekend marathons for building new motor patterns.
4 Finger HUD vs Gyroscope vs 6 Finger — Quick Comparison
| Setup | Skill Ceiling | Learning Curve | Best For |
|---|---|---|---|
| 2 Finger Thumbs | Medium | Very Low | Casual play, newcomers |
| 4 Finger (no gyro) | High | Medium | Ranked grind, competitive |
| 4 Finger + Gyro | Very High | High | Serious ranked, Conqueror push |
| 6 Finger | Extremely High | Very High | Top 100, tournament play |
Most players reach their best performance at 4 finger + gyro and never need 6 finger. The complexity-to-benefit ratio tilts past that point unless you’re deep in Conqueror tier or competing in organized play.
Best Weapons to Use With 4 Finger Layout
Four finger play shines most with spray weapons — guns where continuous fire and ADS control make the difference. These benefit most from the layout:
| Weapon | Why It Pairs Well |
|---|---|
| M416 | Low recoil, consistent spray — easy to manage with simultaneous ADS and move |
| AKM | High damage, benefits directly from crouch-spray via left index |
| Beryl M762 | Aggressive close range where instant scope without releasing fire matters most |
| UMP45 | SMG rushes where jump-fire combos shine |
| DP-28 | Prone spray with fast stance switching via the dedicated crouch button |
For the full weapon breakdown this season, the best guns in PUBG Mobile 2026 guide covers tier rankings across all categories.
FAQ
Q: Is 4 finger HUD better than 2 finger for beginners?
Not right away. If you just started PUBG Mobile, spend your first month with 2-finger controls to learn map awareness, looting rotations, and core gunfight mechanics. Switch to 4-finger once the game itself makes sense — the transition is demanding enough without learning fundamentals at the same time.
Q: What phone size is best for 4 finger claw grip?
Most players find 6.0 to 6.7 inch screens the sweet spot. Below 5.8 inches, index finger reach to the upper screen becomes a stretch. Above 6.9 inches, right thumb coverage across the center gets awkward. Thin bezels give you more usable real estate at any size.
Q: Should I use Hold, Tap, or Mixed ADS?
It depends on your playstyle. Tap ADS is the most popular among experienced 4-finger players for its speed. Mixed ADS works well if you play aggressively at close range and want quick hipfire with held scoping at distance. Try Tap first — if it feels too abrupt, switch to Mixed before writing it off.
Q: Should I enable the Left Fire Button?
Yes. For 4-finger play, the left fire button is a core part of the setup — your left index finger lives there. If you’re getting accidental inputs, adjust placement or button size rather than disabling it.
Q: Can I use 4 finger layout without a case or grip holder?
You can, but a thin rubberized case significantly improves grip stability over long sessions. Bare glass gets slippery as the phone heats up, which causes missed inputs regardless of how good your HUD placement is.
Q: How long does it realistically take to adapt?
Many players find they’re back to their previous performance level after two to three weeks of consistent practice. Noticeable improvements from the layout typically show up in weeks four through six. Avoid judging the switch during the first week — that’s the hardest phase by design.
Q: Should I use a fixed or floating joystick with 4 finger play?
Fixed joystick is generally better for 4-finger setups. Your left thumb stays anchored while the left index finger handles nearby buttons — a floating joystick conflicts with that setup because it’s designed for wide, variable thumb arcs that 4-finger play doesn’t use the same way.
Q: My fire button keeps getting accidentally pressed. What should I do?
Very common in early 4-finger play. Try moving the fire button slightly higher and reducing its size by one step. Also check whether your palm is resting on the right edge of the screen — palm contact there is the most frequent cause of phantom inputs. Some players add a thin screen protector ridge to physically block palm contact.
Q: Does 4 finger layout work in all game modes?
Yes, but the advantage is most pronounced in Classic and Ranked where engagements last longer and peek-fire mechanics matter more. In TDM and arcade modes the gap is smaller because fights are shorter and more reactive — which is exactly why TDM is the best place to practice the new layout without high stakes.
For more PUBG Mobile guides, settings, and control setups, visit Revibyte.

Comments 0
Leave a comment