Table of Contents
Open Table of Contents
- Best 4-2-1-3 Formation Instructions in eFootball 2026
- May 2026 Patch Notes — Why This Formation Gets Better
- Why the 4-2-1-3 Works
- How the Shape Behaves — Defensive and Attacking Structure
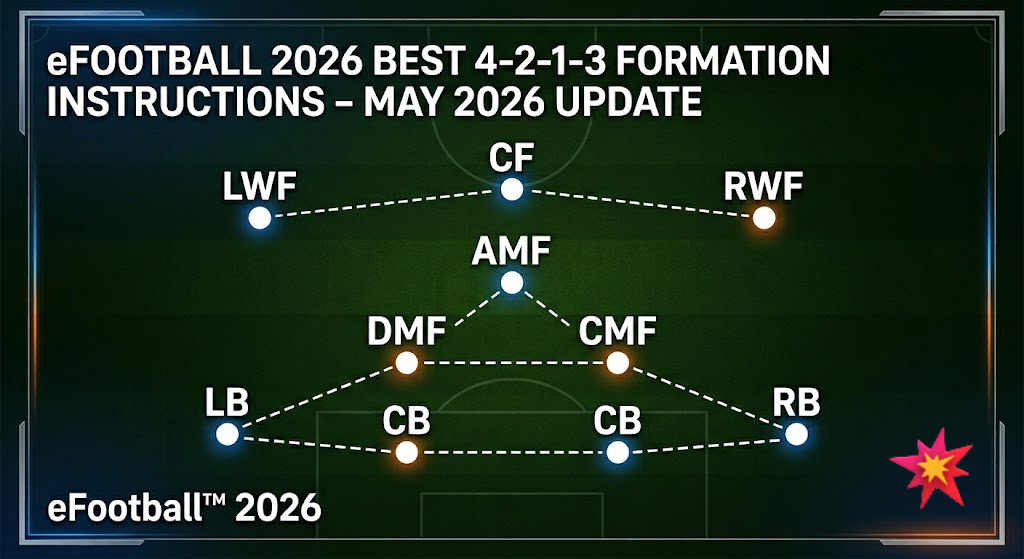
- Full Player Position Breakdown
- Player Examples by Budget
- How Team Playstyle Controls Your Shape
- Individual Instructions — What to Actually Use
- The Playstyle That Makes It Click
- Matchup Analysis — What the 4-2-1-3 Beats and What Beats It
- Common Mistakes and How to Fix Them
- Who Should NOT Use This Formation
- Best Manager for 4-2-1-3 in May 2026
- Quick Reference: Playstyle Combos by Position
- FAQ
- Final Word
Best 4-2-1-3 Formation Instructions in eFootball 2026
I’ve been running the 4-2-1-3 almost exclusively since the May 2026 update dropped, and it’s held up better than almost anything else I’ve tested at high division level. The formation sits at or near the top of the Division 1 leaderboards for a reason — get the instructions right and the AI executes your plan cleanly. Get them wrong and you’ll leak goals through the middle all game, wondering how a shape with two defensive midfielders can feel so open.
This guide covers the full setup: position instructions, playstyle choice, player profiles at every budget, how the shape behaves in attack and defense, which formations threaten it, and how to adapt mid-match.
May 2026 Patch Notes — Why This Formation Gets Better
After the May 2026 update, defensive recovery speed feels noticeably slower across the board. Players who used to scramble back into position after losing the ball now take an extra half-second to reset. That change hits single-pivot midfield setups hard — one midfielder can’t cover enough ground fast enough when caught on the wrong side.
The double pivot in the 4-2-1-3 absorbs that nerf completely. With two players already stationed in deep central positions, you don’t need recovery speed — your shape never breaks in the first place. The Anchor Man especially benefits: he holds position regardless of transition, which makes the penalty for losing the ball significantly lower than with a 4-3-3 or 4-2-3-1 in the current patch.
The other notable change: through-ball detection feels sharper, meaning high-line defenses are easier to punish. The Counter Target instruction on your CF exploits this directly — he holds position high rather than dropping, which means he’s already behind the line when your pivot wins the ball and plays through.
Why the 4-2-1-3 Works
It comes down to the double pivot. Two deep midfielders — an Anchor Man and a Box-to-Box — permanently screen the defensive line, which means the central channel that most formations leave exposed is permanently closed. Single-pivot setups get picked apart here because one midfielder simply can’t cover both sides of the box. The 4-2-1-3 removes that problem entirely.
The AMF operates as the link between the pivot and the front three. One-touch combinations between the AMF, the wide forwards, and the CF are where you actually break teams — that upper triangle (AMF + LWF + RWF + CF) is hard to defend against when the ball moves with purpose.
The formation also suits both Long Ball Counter and Possession Game, which is rare. That versatility explains why you see it at every level of Division 1, run by very different squads.
How the Shape Behaves — Defensive and Attacking Structure
Understanding the shape shift is what separates players who use this formation from players who truly understand it.
Out of possession, the 4-2-1-3 compresses into something closer to a 4-4-1-1. The two wide forwards track back to form a midfield line with the double pivot, the AMF pins slightly ahead of them, and the CF stays high as a pressure outlet. You end up with a compact block of eight that’s extremely difficult to play through centrally. The back four is protected by the pivot so the fullbacks can stay slightly wider without full defensive risk.
In possession and attacking, the shape opens into roughly a 3-2-5. The Anchor Man drops between the CBs to form a back three, the Box-to-Box pushes forward to join the attack as a late runner, one fullback overlaps wide, and the AMF + front three form a five-man attack line. This is why the formation can pin opponents — the attacking overload in the final third is genuine, not cosmetic.
That transition — defensive 4-4-1-1 to attacking 3-2-5 — happens automatically when the instructions are correct. You’re not manually triggering it. The playstyle and individual instructions handle it.
Full Player Position Breakdown
Goalkeeper
High Reflexes and Aerial Superiority are the priorities. The defensive line sits higher with this formation, so a GK with the Rushing Out trait helps against through balls over the top. You’ll also face crosses from overlapping fullbacks, so aerial command matters.
Centre-Backs (CB × 2)
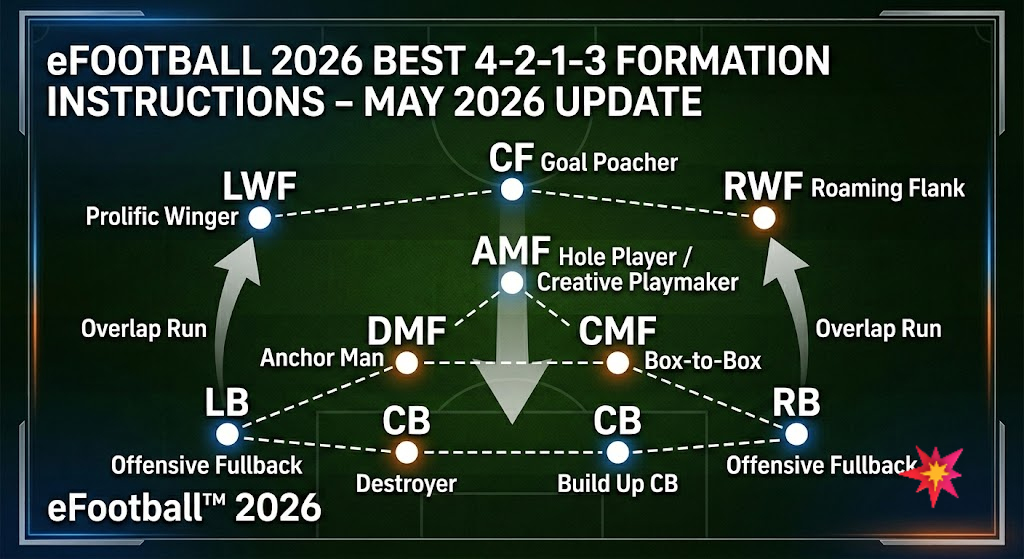
One Build Up CB, one Destroyer (or Defensive CB). The Build Up type receives under pressure and starts moves — your Anchor Man drops between them to create an easy passing triangle. The Destroyer covers aerial threats and cuts dangerous passes. Running two Build Up CBs looks tidy on the ball but leaves you exposed to direct play over the top.
Full-Backs (LB + RB)
Your fullbacks are the primary source of attacking width because your wide forwards drift inside. One fullback carries Offensive Fullback playstyle (on the side opposite your inside-cutting winger, creating a natural 2v1 overlap). The other carries Defensive Fullback for balance. In individual instructions: leave the attacking side on default, set the cover side to Defensive. Against heavy-pressing opponents, flip both to Defensive — the Anchor Man already covers the central space.
DMF × 2 (Double Pivot)
- Anchor Man — holds position between the CBs when play goes wide, never joins attacks, covers central space. Needs high Defensive Awareness and Stamina. Passing quality is secondary; his job is to receive, screen, and recycle.
- Box-to-Box CMF — more license to press higher, win the ball in midfield, and arrive late into attacks. Needs balanced stats: defensive awareness to not leave gaps, stamina to cover the ground, and enough passing to play the right ball forward.
Do not use two Destroyers. Both push up to press simultaneously, leaving a hole in central midfield that quick-passing opponents exploit immediately.
AMF (Attacking Midfielder)
The most important card in the setup — and the hardest to replace. Preferred playstyles:
- Hole Player — penetrates into the final third, stretches the defensive line, finishes from deep
- Creative Playmaker / Classic No. 10 — drops to collect, links play, picks the right pass under pressure
One Touch Pass skill is valuable here. His job is to receive, turn, and play in minimal touches. The individual instruction is Anchoring — it locks him to his central horizontal position and prevents the AI from letting him drift wide when fullbacks overlap. Without Anchoring, he drifts, the central link breaks, and the formation loses its structure.
Wide Forwards (LWF + RWF)
One Prolific Winger who stays wide, stretches the backline, and attacks space in behind. One Roaming Flank or Hole Player who cuts inside to combine centrally. The asymmetry is intentional — it forces the defense to choose: compress and leave space wide, or spread and leave space through the middle. Both options create the opportunity you’re looking for.
Centre Forward (CF)
Two profiles depending on opponent:
- Goal Poacher against deep blocks — finds pockets, makes runs behind, finishes in tight windows
- Target Man against high-pressing teams — holds the ball, brings wide forwards into play, relieves pressure while your shape resets
Counter Target individual instruction applies in both cases. It keeps the CF high, preserves stamina by stopping him from dropping or pressing unnecessarily, and means he’s already in position the moment the pivot wins the ball.
Player Examples by Budget
These aren’t tier lists — just reference points to help connect the positional theory to actual cards.
| Position | Meta / High-Cost | Mid-Budget | F2P-Friendly Profile |
|---|---|---|---|
| Anchor Man DMF | Rodri-type (high DA, physical) | Any DMF with Defensive Awareness 85+ | Defensive-focus DMF, stamina 80+ |
| Box-to-Box CMF | Valverde, Matthaus-type | Balanced CMF with aggression | CMF with both offensive and defensive stats above 78 |
| AMF (Hole Player) | Bruno Fernandes-type | Creative AMF, dribbling 83+ | Hole Player card with One Touch Pass skill |
| CF (Goal Poacher) | Lewandowski-type | Finishing 87+, Offensive Awareness 85+ | Any Goal Poacher with high Finishing |
| CB (Build Up) | Ball-playing CB, passing 82+ | Build Up type, composure-high | Composure 80+, passing 78+ |
The F2P column isn’t about specific cards — it’s about stat thresholds and playstyle assignments. If the playstyle is correct and the stats meet the floor, the card will perform the function.
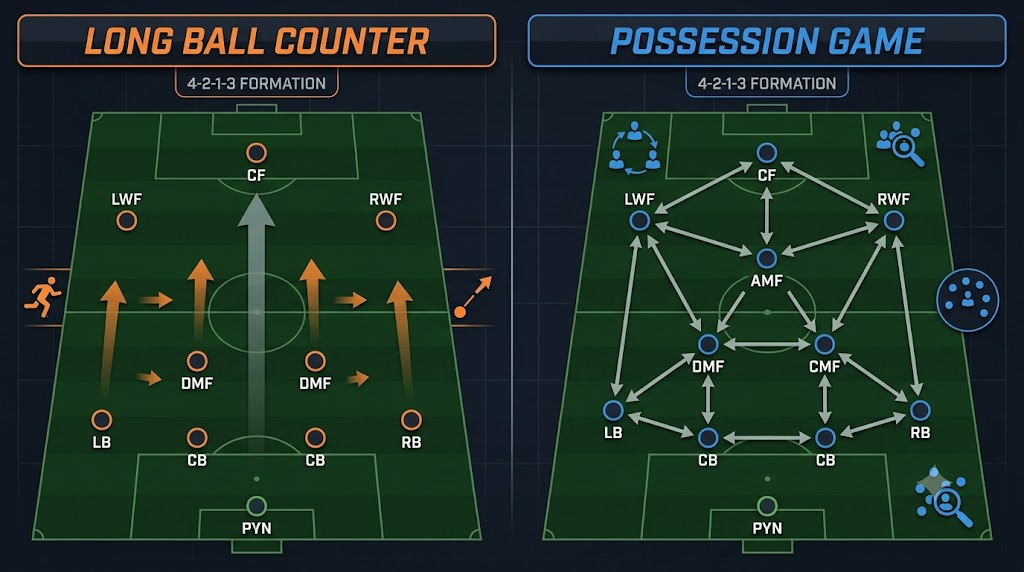
How Team Playstyle Controls Your Shape
eFootball does not have manual sliders for Defensive Line, Compactness, or Pressing. Your chosen Team Playstyle sets all of that automatically. Your manager influences the base values, but you’re working within the playstyle’s parameters, not around them.
Long Ball Counter gives you a deeper defensive line. The team absorbs pressure and sits compact, then the front three sprint into channels immediately when possession switches — your CF is already in position. Rewards clean ball-winning and fast transitions.
Possession Game pushes the shape higher. Players drop close to the ball carrier to create triangles, fullbacks join attacks more frequently. Rewards technical quality throughout the squad — especially from the DMFs and AMF. If those players can’t handle pressure, you’ll lose the ball in dangerous spots.
Pick your playstyle first, then build your instructions and player selection around what it demands.
Individual Instructions — What to Actually Use
eFootball’s instruction menu is lean. No sliders, no “Cut Inside” toggles — behavioral assignments that adjust movement and duty.
- Attacking — Player joins attacks more frequently
- Defensive — Player stays in shape, avoids forward runs
- Anchoring — Player holds central horizontal position strictly, won’t drift wide
- Deep Line — Midfielder drops into the defensive line out of possession
- Counter Target — Forward stays high, preserves stamina, skips pressing duty
| Position | Instruction | Purpose |
|---|---|---|
| CB (Destroyer) | Defensive | No forward runs, holds defensive line |
| CB (Build Up) | Default | Receives under pressure, plays out |
| LB / RB (attacking) | Default | Natural overlap |
| LB / RB (cover) | Defensive | Prevents counter exposure |
| DMF (Anchor Man) | Defensive | Screens CBs, never leaves position |
| CMF (Box-to-Box) | Default | Presses when needed, covers when required |
| AMF | Anchoring | Stays central, preserves the link structure |
| LWF | Default | Width, space in behind |
| RWF | Default | Card’s playstyle drives movement |
| CF | Counter Target | High position, stamina preserved, instant counter threat |
The two fixed instructions are Anchoring on the AMF and Counter Target on the CF. Everything else can flex based on opponent.
The Playstyle That Makes It Click
Long Ball Counter is the more accessible choice. The defensive shape comes from the playstyle itself — you don’t have to manually create it. Win the ball, CF is already positioned high, AMF is between the lines, fullbacks provide width. Two passes and you’re attacking a disorganized defense.
Possession Game asks more from every position. The higher shape and triangle-building require DMFs who can pass under pressure and an AMF who manages tight spaces. When it clicks, it’s a different level of dominance. When it doesn’t, you lose the ball in dangerous areas repeatedly. Start with Long Ball Counter if your squad is still developing.
Matchup Analysis — What the 4-2-1-3 Beats and What Beats It
This is where most guides stop short. Understanding the matchup map is what lets you adapt mid-game rather than just hoping your setup survives.
Favourable Matchups
vs. 4-3-3 (possession-based)
The 4-3-3 typically uses a single pivot, which leaves one central midfielder responsible for covering both sides of the box. Your double pivot overloads that space. Their wide forwards go narrow to support the pivot, which opens the channels for your Offensive Fullback to exploit. Patience wins this one — use the AMF to recycle and wait for the fullback overlap to create the 2v1.
vs. Single-Pivot Formations (4-1-4-1, 4-1-3-2)
Single pivot setups are structurally disadvantaged against the double pivot in the May 2026 patch specifically because of slower recovery. Your AMF and CF can press the single DMF, force him wide, and the passing lane to the attack breaks down. Attack through the center aggressively here.
vs. Narrow Formations (4-3-1-2, 3-5-2)
Narrow formations leave wide space open by design. Your Offensive Fullback + wide forward combination repeatedly attacks the flank. Once the defense collapses wide to cover, the AMF arrives in the central pocket — cross into box or cutback to AMF in space.
Difficult Matchups
vs. 3-2-4-1 or 3-4-2-1 (overload attacks)
Three at the back with two wide midfielders creates a genuine width problem. Their wide midfielders pin your fullbacks defensively, which removes your attacking width advantage. The central overload of 4 vs. your 3 in the middle also creates numerical problems. Adjustment: flip both fullbacks to Defensive, drop Box-to-Box CMF to Deep Line to create a temporary back five, and be patient in possession. Don’t try to play through the sides — use the AMF as the fulcrum and wait for them to overcommit.
vs. Double AMF Systems (4-2-2-2)
Two AMFs against your single AMF creates a pressing problem in the middle third. They can double-press your AMF every time he receives, reducing his effectiveness as the link. Adjustment: switch to Target Man as your CF and use him as a pressure outlet — hold up, lay back to AMF, reset. Alternatively, bypass the midfield entirely with direct passes to the wide forwards.
vs. Fast Quick Counter (wing-heavy)
Wing-spam opponents who spam early crosses when your fullbacks are advanced create repeated crossing situations against your CBs. The Destroyer CB handles aerial threats, but volume is the issue. Adjustment: pull one fullback back to Defensive instruction, accept you’re slightly narrower in attack, and prioritize winning the second ball after crossed deliveries. Your double pivot should be positioned to immediately recycle possession after a cleared cross.
Common Mistakes and How to Fix Them
Mistake 1: Two Destroyers in the double pivot
They both press high simultaneously, leaving a gap behind them. One Anchor Man stays, one Box-to-Box moves. That’s the pairing.
Mistake 2: No Anchoring on the AMF
Without it, the AI lets him drift toward any open space — especially when a fullback overlaps on his side. The pivot-to-front-three link disappears. Set it once, leave it.
Mistake 3: Both fullbacks on Defensive
No width. Wide forwards go 1v1 every attack. The formation’s attacking overload collapses. The double pivot protects the space behind the fullbacks — trust it, keep at least one on Default.
Mistake 4: Wrong CF profile against deep blocks
Target Man against a low block is a mismatch. Switch to Goal Poacher — he finds pockets, makes runs into tight spaces, and finishes where the Target Man just holds. Reserve the Target Man for opponents who press high.
Who Should NOT Use This Formation
The 4-2-1-3 is not a universal solution. If your playstyle relies heavily on:
- Manual dribbling with wingers — the inside-cutting movement of the wide forwards reduces your space to dribble directly. You’ll feel restricted if 1v1 skill is your primary offensive weapon.
- Pressing everywhere with manual control — the Anchor Man’s job is to hold position. If you constantly switch to him to press, you’ll pull him out of his zone and break the defensive structure yourself.
- Playing without a true creative AMF — an average AMF in this setup doesn’t just underperform, he actively hurts you. The pivot-to-attack link depends on technical quality in that position. A below-average AMF means the front three become isolated.
If any of those apply, a 4-3-3 or 4-2-3-1 will give you more flexibility with a lower skill-ceiling requirement.
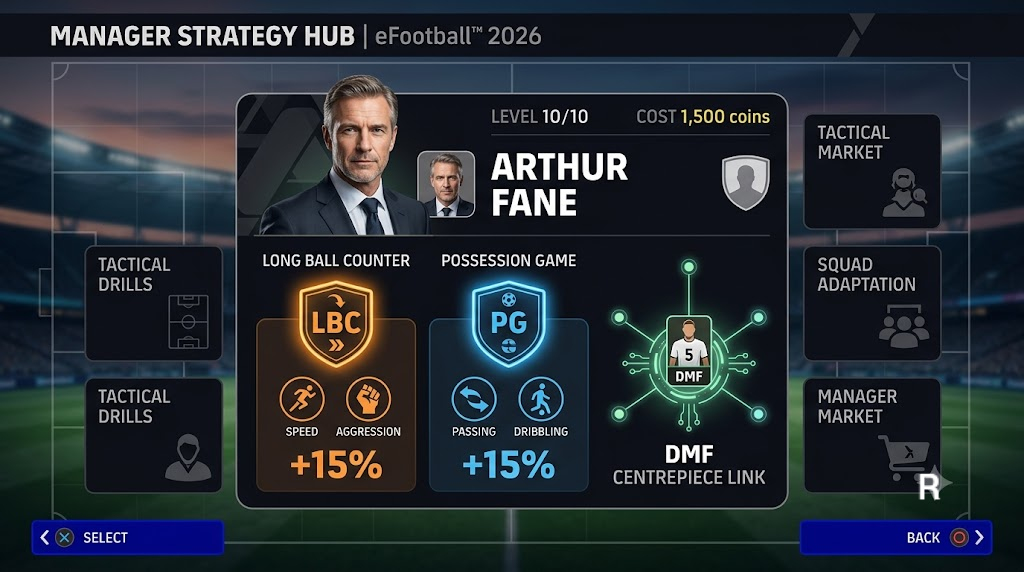
Best Manager for 4-2-1-3 in May 2026
For Long Ball Counter, find a manager with that as their boosted Team Playstyle. Prioritize link-up bonuses that involve either the DMF (as passing hub) or the CF (as counter trigger). Managers with a DMF Centrepiece link amplify what the formation already does — the Anchor Man’s bond to either a CB or a forward creates automatic movement that fits the transition pattern. Speed and Aggression stat boosts suit Long Ball Counter because the counter window is short and slow forwards miss it.
For Possession Game, technical attribute boosts matter most — passing, dribbling, ball control. Manager profiles modelled on high-press possession coaches (Klopp-type link between a ball-playing CB and a wide forward) mirror how this formation moves the ball in buildup naturally.
Two managers running the same playstyle won’t produce identical results. The link-up pair and stat distribution vary significantly — check the current market before spending coins.
Quick Reference: Playstyle Combos by Position
| Position | Best Playstyle | Alternative |
|---|---|---|
| GK | Rushing Out | Traditional Shot-Stopper |
| CB1 | Build Up | Sweeper |
| CB2 | Destroyer | Defensive CB |
| LB / RB | Offensive Fullback | Defensive Fullback |
| DMF | Anchor Man | Destroyer |
| CMF | Box-to-Box | Orchestrator |
| AMF | Hole Player | Creative Playmaker |
| LWF | Prolific Winger | Roaming Flank |
| RWF | Roaming Flank | Inside Receiver |
| CF | Goal Poacher | Target Man |
FAQ
Q: Is the 4-2-1-3 good for beginners in eFootball 2026?
Not the easiest starting point. The double pivot requires you to understand defensive positioning and the AMF role needs deliberate, purposeful play. Start with 4-3-3 to understand spacing and midfield balance, then transition here once you’re comfortable with how the central structure works.
Q: What’s the best playstyle for the 4-2-1-3 in May 2026?
Long Ball Counter is the most accessible and consistent for most players. Possession Game works too but demands stronger squad depth, especially in midfield. Both are legitimate at Division 1 level.
Q: Do I need two DMFs or can I use one DMF and one CMF?
The card position matters less than the playstyle and individual instruction. One Anchor Man on Defensive instruction, one Box-to-Box on Default — that’s the pivot. Whether the second card says DMF or CMF on its face is secondary.
Q: Should both fullbacks always be on attacking instructions?
No — one on Default (attacking side), one on Defensive (cover side) is the standard setup. Wide forwards drift inside in this formation, so the fullbacks provide width. But pulling the cover-side fullback back prevents you from being caught with both advanced simultaneously.
Q: Can I use the 4-2-1-3 with a press-heavy approach?
Pressing intensity is determined by your Team Playstyle, not a standalone toggle. Quick Counter and Possession Game both include more aggressive pressing behavior. The double pivot gives the structural cover that makes pressing less risky regardless of which you choose.
Q: What’s the weakness and how do I deal with it?
Wide overloads — specifically three-at-the-back systems with active wide midfielders. They pin your fullbacks and remove your attacking width advantage. Counter by setting both fullbacks Defensive, using Deep Line on the Box-to-Box to create a back five out of possession, and routing attacks through the AMF centrally rather than wide.
Q: What’s the best striker for this formation?
Goal Poacher for most situations — the formation creates central overloads and he exploits them. Counter Target instruction keeps him positioned. Target Man works against high-pressing opponents who give you time to build; he holds, lays off, and brings wide forwards into play.
Final Word
The 4-2-1-3 succeeds because it solves the hardest problem in eFootball: controlling central space without losing attacking width. The double pivot closes the channel that most formations leave open. The Anchor Man drops into the back line to create a 3-2-5 attack shape without needing an instruction. The AMF links the two phases with one touch.
After the May 2026 recovery speed changes, this formation got materially better — not because it was buffed directly, but because the setups that competed with it got worse. That’s the kind of structural advantage that tends to persist through multiple patches.
If your squad has a reliable AMF and two disciplined midfielders who can hold position, this formation gives you a coherent answer to almost every meta setup in the current patch. If your AMF is average, build around a different shape and come back to this one when you can upgrade that slot.
Last updated: May 2026 — eFootball™ 2026 Season Update. Formation meta shifts with patches — always verify against the current Division 1 leaderboard when a major update drops.
Comments 0
Leave a comment